The Basic Principles of Remote Debugging
When GNU Debugger is running on one machine and the program being debugged on another – this is called remote debugging. Commonly GNU Debugger is running on a classic PC while the program being debugged is running on some sort of embedded board / or in our case on a ZX Spectrum.
The GNU Debugger for Z80 on PC side knows everything about Z80: the registers, the instructions, the address space. It also knows everything about the debugged program because the debugged program is first loaded into GNU Debugger on PC side and only then sent to ZX Spectrum via serial line by GNU Debugger using special protocol. So the GNU Debugger has the opportunity to examine program’s symbolic information and obtain address of every variable and every function within the program.
- setting a breakpoint at certain address by writing an instruction that returns control to the debugger (RST) there;
- overwriting breakpoints by program’s code on continue,
- returning the values of all registers.
Remote Debugging using FUSE ZX Spectrum Emulator
Remote debugging of code running on an emulator requires a bit more effort. First the serial protocol on ZX Spectrum is converted to named pipe protocol on Unix. Escape sequences are inserted into named pipe data stream to separate data bits from control bits. This makes direct stream communication with the GNU Debugger impossible due to data corruption. And as if this was not bad enough – the GNU Debugger does not speak named pipes. It only “speaks” RS232 and IP. The solution is to write a PC program which talks to both sides in their own language. It communicates with GNU Debugger using IP protocol and with FUSE using named pipes and escape sequences.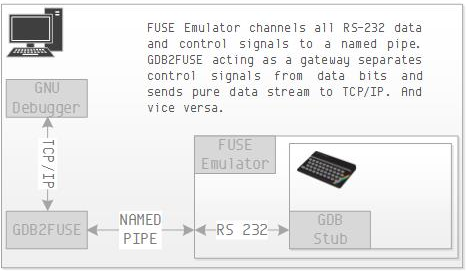
This program is called GDB2FUSE. It has been added to the yx repository. So clone or pull the yx repository to your working folder again. Then go to subfolder yx/tools/gdb2fuse and do make. It will build the command line tool that you need. You may want to copy it to your /usr/local/bin for frequent use.
The GDB Stub for ZX Spectrum
Primarily it requires us to write serial read and write procedures in a way to trick the buggy FUSE Emulator to.
We also need to change breakpoint command because the original gdb-z80 uses RST8 jump instruction for that and on the ZX Spectrum this is reserved for Interface 1 calls. And we do need Interface 1 because serial port is part of it.
To cut the long story short, you can download the code for ZX Spectrum stub from git and compile it. It is locate in yx/tools/gdb-zxspectrum-stub folder and has a Makefile to make things easier for you. This will produce the 48.rom file for you. Currently it only runs on Fuse emulator.
Allright! Let's Do It!
First let us create named pipe files in your home folder. Go to your home folder and do
mkfifo rx tx
gdb2fuse 6666 ~/tx ~/rx
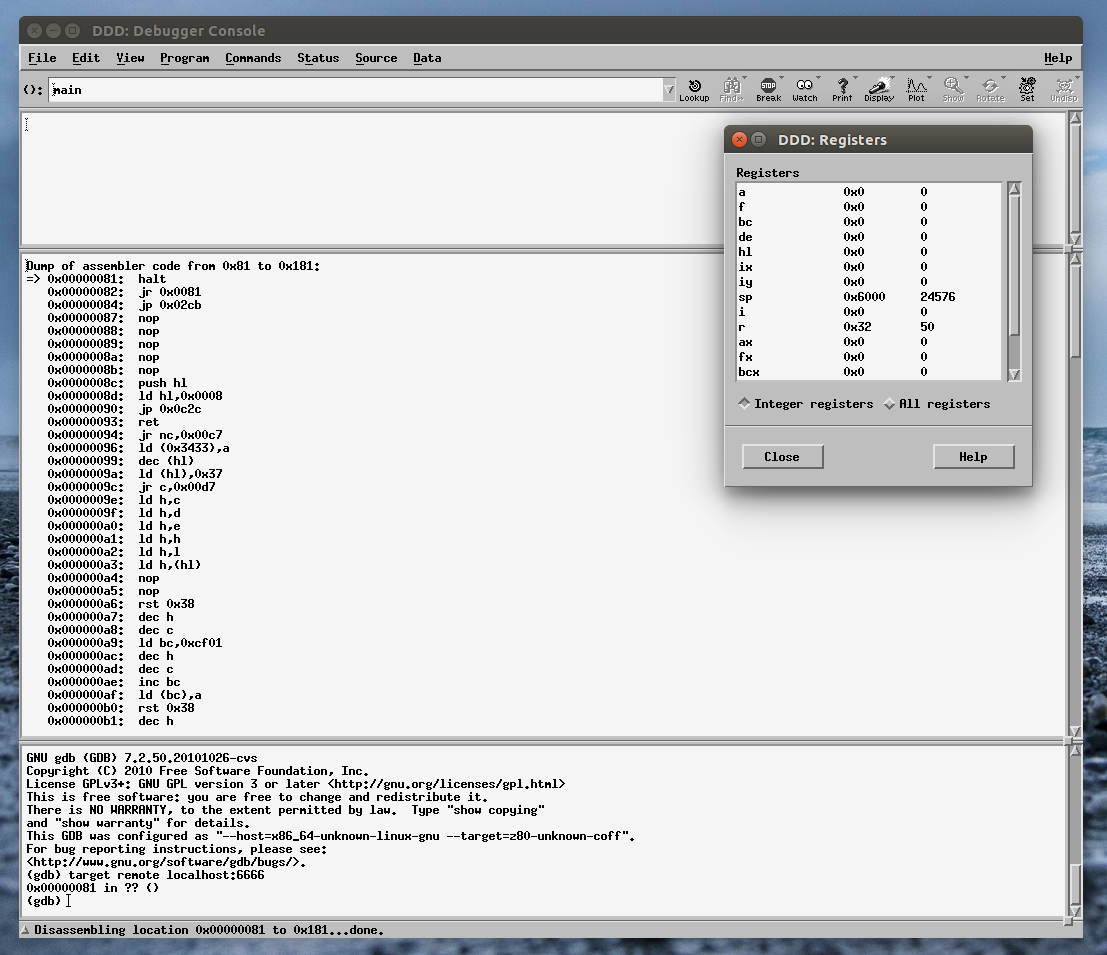
fuse --machine 48 --interface1 --rs232-tx ~/tx --rs232-rx ~/rx --graphics-filter 2x --no-rs232-handshake --rom48 48.romSpectrum's screen should be black. This signals it is in server mode and listening on the serial port for debugger's commands. Now is the time to run the GNU Debugger.
ddd --debugger /usr/local/bin/z80-unknown-coff-gdb &Then go to bottom pane and type
target remote localhost:6666
In this -third- part of our tutorial we are going to compile the GNU Debugger. It was ported to the Zilog Z80 architecture by Leonardo Etcheverry and is available from his git repository. The code is old and you need to apply some hacks for it to compile.
First install some additional tools. These are not part of the standard Ubuntu installation:
sudo apt-get install ncurses-dev flex bison
GNU Debugger also requires the texinfo package. But shall avoid compiling documentation because it is outdated and recent versions of texinfo are too strict for the job.Now fetch gdb-z80 source code by first cd-ing to your ~/dev folder and executing:
git clone https://github.com/legumbre/gdb-z80.git
cd gdb-z80
You are now ready to compile. Configure the package for cross debugging. Here is the command to do it:
./configure --enable-werror=no --target=z80-unknown-coffThe target of cross compilation is z80. The --enable-werror=no switch turns off error on warning behaviour on newer versions of gcc. The code is too old to pass without warnings and we don't want them to break the compilation.
Before running make we need means to avoid compiling documentation. The tool that we strive to avoid is makeinfo which is part of texinfo package. As you can remember we did not install it. So we are going to make the make think we have it by redirecting it to another tool which will do ... absolutely nothing ... and return success. It just so happens that unix has such a tool. It's called Wine. No, wait. It is called /usr/bin/true.
So here is how we call our make file
make MAKEINFO=trueWe apply the same trick to install gdb-z80 to destination folder
sudo make MAKEINFO=true installIf everything went according to our grand plan there are two new files in your /usr/local/bin folder.
ls /usr/local/bin
z80-unknown-coff-gdb  z80-unknown-coff-gdbtui
Grand! Now install your favourite GDB GUI. I recommend the Data Display debugger. It is absolutely archaic piece of technology and brings you back to the early days of unix when Motif roamed the earth. Just the right tool for ZX Spectrum development.
Install the DDD
sudo apt-get install dddAnd test our system by passing gdb-z80 to the Data Display Debugger using the --debugger option.
ddd --debugger z80-unknown-coff-gdb &

Yaay. You have a debugger for Z80 on your system. Next time we are going to dwelve into remote debugging and step through a program on your ZX Spectrum emulator.
Till then ... be patient.
So You Wanna Be a ZX Spectrum Developer? (Part II. The Template Application)
1 comment(s) at 5:23 AM
Let us compile'n'run stuff.
In part I. of this turorial you "gitted" yx repository to your local disk. If you followed the tutorial then your target folder was ~/dev/yx.
Open the terminal and set this as your current working folder. Go to tools subfolder (e.g. execute cd ~/dev/yx/tools). There are a bunch of useful tools inside but right now we are only interested in makezxbin. This is an upgraded makebin tool that enables us to use SDCC C compiler for ZX Spectrum development.
You are free to choose z88dk instead. But SDCC is -in my opinion- a more mature environment. It supports C99; has as advanced code optimizer; and produces gdb-z80 compatible symbolic information. z88dk on the other side has superior libraries and ZX Spectrum support.You can compile and deploy makezxbin like this:
cd makezxbin
gcc makezxbin.c -o makezxbin
sudo mv makezxbin /usr/bin/makezxbin
Congratulations! You now have a complete suite of compiler tools needed to develop for ZX Spectrum.
Now go to the ~/dev/yx/apps/template folder and run make. This will create a template application which writes a value of 255 to the first byte of video memory. When it is run the result will be 8 pixel line in the first row of the screen:

The make file will also run the emulator and load your app.You can use this template application as a quick starter for most of your development projects. Let's analyse it.
First there is a pretty straightforward Makefile. Its main target is app.bin. The Makefile assumes that all *.c files ald all *.s files are part of our project. Thus if you add new source files - it will automatically consume them as part of our project.
For easier understanding here are the unconventional tricks of this Makefile:
- it uses your standard gcc (and not SDCC!) compiler to generate .depend file out of *.c and *.h source files for easier compilation,
- it puts crt0.s to 0x8000 and your program to 0x8032, so if you change crt0.s (increasing its length above 0x32 bytes) make sure you update your programs' start address,
- it uses our makezxbin tool to generate correct binary (makebin has a bug and can't be used for this purpose), and
- it uses SDCC all the way but at the end executes appmake +zx --binfile ./app.bin --org 32768 to generate ZX Spectrum tape. appmake is part of z88dk and this is one reason installing both development environments in part I. of this tutorial.
- stores current stack pointer and contents of all registers,
- jumps to start of GSINIT assembler section where the SDCC compiler places all global variables initialization code,
- establishes stack (1KB) and heap global symbols for our program,
- jumps to _main C function, and
- when the main concludes restores registers and stack and returns control to BASIC.
void main() {
    unsigned char * vmem = 16384;
    (*vmem)=255;
}
You can examine the locations of your symbols (variables, functions) by opening crt0.map file after compilation.That's it for yoday. Enjoy your experimenting. Our next tutorial will be about debugging.
Here are some useful tips to help you start.
1. Download latest version of Ubuntu Desktop edition. I warmly recommend that you create a separate environment either by installing Ubuntu to a new partition or to a virtual machine. You see ... mid age crises ... come and go. While installed packages ... stay on your disks forever.
2. Download and install FUSE – the ZX Spectrum emulator. Since it lacks Sinclair ROM files, download and install these too.
sudo apt-get install fuse-emulator-gtk spectrum-roms

3. Download and install development suites.
sudo apt-get install sdcc z88dkYou don't actually need both C compilers. But each brings some handy tools that other can use. So install them both.
4. Download git and subversion so you'll be able to check out files from remote repositories
sudo apt-get install git subversion5. Install Z80 language definition for gedit.
5.1. Download z80.lang.zip and extract file z80.lang.

5.2. Modify it by changing this line:
<property name="globs">*.z80</property>to this line:
<property name="globs">*.s</property>You are telling gedit to treat all files with extension *.s as Z80 syntax files.
5.3. Now copy z80.lang into /usr/share/gtksourceview-3.0/language-specs folder.
6. Open terminal, create work folder and download the yx repository.
tomaz@jabba:~$ mkdir dev
tomaz@jabba:~$ cd dev
tomaz@jabba:~/dev$ git clone https://github.com/tstih/yx.git
Cloning into 'yx'...
remote: Reusing existing pack: 755, done.
remote: Total 755 (delta 0), reused 0 (delta 0)
Receiving objects: 100% (755/755), 5.60 MiB | 398.00 KiB/s, done.
Resolving deltas: 100% (270/270), done.
Checking connectivity... done.
tomaz@jabba:~/dev$ cd yx
tomaz@jabba:~/dev/yx$ ls
apps  buddy  os  README.md  tools
tomaz@jabba:~/dev/yx$_
7. Extend gedit.
7.1. First open file ~/dev/yx/os/rom/crt0.s with gedit. If Z80 language is installed correctly you should see highlighted Z80 code.

7.2. Now press F9 or select menu option View -> Side Panel. When the left pane appears change tab at the bottom of left pane from Documents to File Browser.

That's it for today. In second part of this tutorial we're going to compile and run stuff. Promise.
If you trap an exception inside your control and don't know how to handle it - turn it into an event.
public event EventHandler<ExceptionEventArgs> Exception;Raise the event inside the catch block.
Introduction
Object oriented programming is an ancient art. When you hear about inversion of control or dependency injection, you should know that these are new names for concepts that have been around for a long time. Today we are going to explore one such ancient technique: a pattern for populating a tree control using the inversion of control; from the early days of computing when resources were sparse.
Let us create a Windows Forms derive Tree View to visualise a hierarchy in an elegant manner. When I say elegant I mean:
- minimal memory signature,
- making control reusable,
- lazy loading data as the user drills down the tree, and
- allow various data objects to be attached to tree nodes.
There is really only one trick behind it: populate top level nodes and check if they have any children. If they do - insert a dummy node under them so that + appears left of the tree node. This will enable tree node expansion. Detect it and populate sub-tree using exactly the same technique.
In 2002 I have published an article on modelling hierarchies using SQL based DBMS. If the data that you visualise uses such storage there are some good tricks there to consider.
The Tree Node
First we need to define a tree node data structure. This is basic building block of our tree structure. It is independent of presentation method. You will be surprised to see that the class has no reference to its parent or its children. Because we are using lazy loading these references are resolved when needed. The code for resolving them is separated to the hierarchy feed class.
public class Node
{
    public Node(string unique, string name, bool hasChildren)
    { Unique = unique; Name = name; HasChildren = hasChildren; }

    public string Unique { get; set; }
    public string Name { get; set; }
    public bool HasChildren { get; set; }
}
The three fields are:
Unique This is the identifier (or the key) of this particular node.
Name This is human readable name for the node.
HasChildren True if node has children and can be expanded.
The Feed
We want the user to be able to use our control for visualizing any hierarchy with minimal effort. Here is a minimalistic tree feed interface. All you really need to implement is a function to query children of a node (or root nodes if parent is not given).
public interface IHierarchyFeed
{
    List<Node> QueryChildren(Node parent);
}
For better understanding of how this feed works let us observe an implementation of this interface for enumerating files and folders in the file system.
public class FileSysHierarchyFeed : IHierarchyFeed
{
    private string _rootPath;
    private string _filter;

    public FileSysHierarchyFeed(string rootPath, string filter)
    {
        _rootPath = rootPath;
        _filter = filter;
    }

    public List<Node> QueryChildren(Node parent)
    {
        List<Node> children = new List<Node>();
        if (parent == null)
            AddFilesAndFolders(_rootPath, children);
        else
            AddFilesAndFolders(parent.Unique, children);
        return children;
    }

    #pragma warning disable 168 // Ex variable is never used.
    private void AddFilesAndFolders(string path, List children) {
        foreach (string fso in Directory.EnumerateDirectories(path,"*.*",SearchOption.TopDirectoryOnly)) {
            string unique=Path.Combine(path,fso);
            try { children.Add(new Node(unique, Path.GetFileName(fso), Directory.EnumerateFileSystemEntries(unique).Count() > 0)); }
            catch (UnauthorizedAccessException ex) { } // Ignore unauthorized access violations.
        }
        foreach(string file in Directory.EnumerateFiles(path,_filter)) children.Add(new Node(Path.Combine(path,file),Path.GetFileName(file),false));
    }
}
Simple, isn’t it? You initialize the feed object with root path and filter, for example c:\ and *.*. When you call QueryChildren with null parameter it returns files and folders from the root path. It uses entire path as the node unique. When calling QueryChildren on a particular node it extracts path from the unique and uses it to enumerate files and folders under this folder.
You can easily write feeder class for database items, remote items, etc.
The TreeView Control
Last but not least - here is the tree view derived control.
public class NavigatorTree : TreeView
{
    private class ExpandableNode
    {
        private Node _node;
        private IHierarchyFeed _feed;
        public ExpandableNode(Node node, IHierarchyFeed feed) { _node = node; _feed = feed; }
        public void Expand(TreeNode treeNode) {
            treeNode.TreeView.BeginUpdate();
            treeNode.Nodes.RemoveAt(0); // Remove expandable node.
            foreach (Node childNode in _feed.QueryChildren(_node))
            {
                // Add company.
                TreeNode childTreeNode = treeNode.Nodes.Add(childNode.Name);
                childTreeNode.Tag = childNode;

                // Check if there are any children.
                if (childNode.HasChildren)
                {
                    TreeNode toExpandNode = childTreeNode.Nodes.Add("");
                    toExpandNode.Tag = new ExpandableNode(childNode, _feed);
                }
            }
            treeNode.TreeView.EndUpdate();
        }
    }

    private IHierarchyFeed _feed;

    public void SetFeed(IHierarchyFeed feed)
    {
        _feed = feed;
        Populate();
    }

    private void Populate()
    {
        Nodes.Clear();

        BeginUpdate();
        foreach (Node node in _feed.QueryChildren(null))
        {
            // Add company.
            TreeNode treeNode = Nodes.Add(node.Name);
            treeNode.Tag = node;

            // Check if there are any children.
            if (node.HasChildren)
            {
                TreeNode toExpandNode = treeNode.Nodes.Add("");
                toExpandNode.Tag = new ExpandableNode(node, _feed);
            }
        }
        EndUpdate();
    }

    protected override void OnBeforeExpand(TreeViewCancelEventArgs e)
    {
        // Check if node has only one child and that child is expandable.
        if (e.Node.Nodes.Count == 1)
        {
            ExpandableNode expandable = e.Node.Nodes[0].Tag as ExpandableNode;
            if (expandable != null)
                expandable.Expand(e.Node);
        }
    }
}
Voila. It doesn’t get any simpler that that. You initialize tree control by calling SetFeed and providing feed class. For example:
navigatorTree.SetFeed(new FileSysHierarchyFeed("c:\\", "*.*"));
The control then calls Populate() which in turn populates first tree level and links every tree node with corresponding Node object via the Tag field. If a node has children the populate function adds a fake node of type ExpandableNode under it.
In OnBeforeExpand function the control checks for ExpandableNode. If it founds it - it calls it’s expand function to populate next tree level … and removes the fake node.
This is an advanced sequel to C#: Enums and Strings Are Friends. One of particularly interesting features of an enum is the possibility of extending its values with attributes.
public enum Digits
    {
        [Arabic("1")]
        [Roman("I")]
        One=1,
        [Arabic("2")]
        [Roman("II")]
        Two,
        [Arabic("3")]
        [Roman("III")]
        Three
    }
These values can be obtained using .NET reflection mechanism. .NET already defines a lot of useful attributes such as Description, DisplayName, DefaultValue.On top of that you are able to derive your custom attributes from the Attribute class. By adding properties to this class you can attach a plethora of information to each value of an enum.
[AttributeUsage(AttributeTargets.Field)]
public class RomanAttribute : Attribute
{
    private readonly string _digit;

    public string Digit
    {
        get { return _digit; }
    }

    public RomanAttribute(string title)  // url is a positional parameter
    {
        _digit = title;
    }
}
Wouldn't it be nice if we could read value of any property of any attribute straight off enum value? The problem with this concept is ... properties of different attributes have different names. For example: DescriptionAttribute has property named Description, and DisplayNameAttribute has property named DisplayName.Luckily we live in the age of generics and reflections. So reading these properties no longer requires hard coded attribute type and target property. You can simply pass attribute type, property type, property name and enum to a function and let reflection do its business.
// Read [Description] attribute.
Enum e = Days.Sat;
string s = e.GetAttributeProperty<DescriptionAttribute, string>("Description");
Console.WriteLine("Description is {0}", s);
// Read [DisplayName ] attribute.
s = e.GetAttributeProperty<DisplayNameAttribute, string>("DisplayName");
Console.WriteLine("Display name is {0}", s);
// Find enum value based on [Description].
Enum ef = e.FindEnumValueByAttributeProperty<DescriptionAttribute, string>("Description","Friday");
All that is left is to write these two conversion functions.
public static class EnumEx
{
    #region Enum Extensions
    public static PT GetAttributeProperty<AT, PT>(this Enum this_, string propertyName)
        where AT : Attribute
        where PT : class
    {
        // First get all attributes of type A.
        AT[] attributes =
            (this_.GetType().GetField(this_.ToString())).GetCustomAttributes(typeof(AT), false) as AT[];

        if (attributes == null || attributes.Length == 0) // Null or can't cast?
            return null;
        else
        { // We have something.
            AT a = attributes[0];
            PropertyInfo pi = a.GetType().GetProperty(propertyName);
            if (pi != null)
            {
                PT result = pi.GetValue(a, null) as PT;
                return result;
            }
            else
                return null;
        }
    }

    public static Enum FindEnumValueByAttributeProperty<AT, PT>(this Enum this_, string propertyName, PT propertyValue)
        where AT : Attribute
        where PT : class, IComparable
    {
        // First get all enum values.
        Array enums = Enum.GetValues(this_.GetType());
        foreach (Enum e in enums)
        {
            PT p = e.GetAttributeProperty<AT, PT>(propertyName);

            if (p!=null && p.Equals(propertyValue))
                return e;
        }
        return null;
    }
    #endregion // Enum Extensions
}
UPDATE: It seems like the usage of < and > symbols in code corrupted the listings. Fixed it.
If you need a portable .NET solution for converting RGB to HLS and vice versa there are libraries around to do it. For Windows only using the Shell Lightweight Utility Functions is a simpler alternative.
[DllImport("shlwapi.dll")]
static extern int ColorHLSToRGB(int H, int L, int S);
[DllImport("shlwapi.dll")]
static extern void ColorRGBToHLS(int RGB, ref int H, ref int L, ref int S);
// RGB2HLS
ColorRGBToHLS(ColorTranslator.ToWin32(rgbColor, ref h, ref l, ref s);
// HLS2RGB
Color rgbColor=ColorTranslator.FromWin32(ColorHLSToRGB(h, l, s));
Many thanks to John Boker for his concise explanation. What a time saver.
"Margin is on the outside of block elements while padding is on the inside. Use margin to separate the block from things outside it, padding to move the contents away from the edges of the block."
Sometimes you want a function to return an object or null if no object is found. Lazy evaluation makes it easy to automate this behaviour.
public Person FindPerson(Criteria c)
{
    Lazy<Person> person = new Lazy<Person>();
    // Code to actually find a person ...
    // ... and populate person.Value
    return person.IsValueCreated ? person.Value : null;
}
This is fairly ellegant. If no person is found lazy evaluation assures that the object is never created and related resources are not spent. Be careful though! Here's a common pest.foreach (Font font in GetFixedFonts())
{
// But GetFixedFonts returned null.
}The fictional GetFixedFonts() function called in code bellow returns Font[] collection. You assume it will always return a non- null value. But then on a bad day it doesn't and your code breaks with an exception.You can assure that function always returns an array /even if empty/ by using lazy evaluation too. Here is an example of that.
public FontFamily[] GetFixedFonts()
{
    Lazy<List<FontFamily>> fonts = new Lazy<List<FontFamily>>();

    foreach (FontFamily ff in System.Drawing.FontFamily.Families)
        if (IsFixedFontFamily(ff))
            fonts.Value.Add(ff);

    return fonts.Value.ToArray();
}
You know the drill. Programming a graph takes too much time...use a library...or hire an external consultant. But...is it really so?
Imagine you have two coordinate systems. Your physical screen coordinate system spans from 0 to window's width horizontally and from 0 to window's height vertically. And your imaginary world (i.e. a map) spans from -10.000 to 10.000 horizontally and from 0 to 5000 vertically.
Just to make things a bit more complex you also want to:
- zoom everything on the screen by arbitrary zoom factor, and
- show only part of your map on the screen starting from point T(-3.000, 1000) given in map coordinates, where -3000 is left and 1000 is top coordinate of part of map we would like to display on screen.
Map to Screen
Are you scared yet? Don’t be. Here is the basic formula for converting map coordinate to screen coordinate:

Same formula can be applied to another dimension. For example:

So far ... so trivial. :) Since you start at point T(x,y) you need to put x and y to point to 0,0 on the screen. Afterwards you simply multiply by zoom factor. If factor is 1 then 1 point on the map is converted to 1 point on the screen. If the factor is 1:2 then 1 point on the map is only ½ point on the screen. And so on.
If the axis is a reverse axis then your equation is:

Screen to Map
What if somebody clicks on the screen and we need to find map coordinate of the click? Let us derive this scenario from the above equation:

Deriving same formula for the reverse axis is a good exercise for you, don’t you agree? :)
Fit to Screen
If we want to fit our map inside the screen we must start drawing it at its T=T0 point. We calculate T by using:

No big secrets here. So our left, right point T is at map's min x and min y. And if reverse axis is being used we must use max instead.
The apropriate fit to screen zoom is calculated like this:

If you are using same unit for both axes then there will be only one zoom factor. To still fit map to the screen make sure that you fit larger dimension of both - width or height to fit the screen. Then use the same zoom factor for smaller dimension. This way both are guaranteed to fit the screen.
Calculate Distances
Last but not least ... distances are calculated with a little help from previous calculations. If you have a distance in screen units and you would like to convert to map distance you subtract it from point zero and derive the formula like this:

The distance obviously depends on the zoom factor alone. For better understanding derive the opposite formula and get screen distance from map distance yourself. :)
Coming Next...
So there you have it. Most of these formulas are -in fact- just simplified 4 x 4 matrix translation, usually performed for you by modern 2D graphics engines such as GDI+ or Cairo.
Observing simplicity of graph math one realizes that graphs aren't really such a terrible development effort. It's drawing points, lines and polygons using these formulas to translate coordinates. Zooming is changing the zoom factor, and scrolling is changing the T point. We will take a closer look at these operations in part two of this series.
A singleton is like the Egg of Columbus. Easy after someone had showed you how to do it. Luckily Jon Skeet had showed us how to use lazy evaluation for thread safety. And an unknown contributor of Great Maps had demonstrated the usage of generics for that purpose. So all that is left for me - is to put it all together.
public sealed class Singleton<T> where T : new()
{
    private static readonly Lazy<T> instance = new Lazy<T>(() => new T());

    public static T Instance { get { return instance.Value; } }

    private Singleton()
    {
    }
}

// Create two server objects pointing to the same instance.
Server svr1 = Singleton<Server>.Instance;
Server svr2 = Singleton<Server>.Instance;
Reference:- C# In Depth: Implementing the Singleton Pattern in C#
- GMap.NET Singleton Class