C# Join function took all the fun out of trivial programming. In the old days creating a comma separated string out of an array of string was a daunting task for junior programmers.
Some would use the postfix technique. Typically they would iterate through an array adding a comma after each string. At the end they would remove the last comma. But only if string was not empty.
Another approach was to add a comma only if string was not the last in the array. This meant abandoning foreach loop to be able to compare index to array size.
There is a much more elegant solution. It might not be useful in C# because the string class already provides this function, but it is a good to know algorithm.
string Join(string separator, string[] array)
{
    StringBuilder sb = new StringBuilder();
    string prefix = null;
    foreach (string s in array)
    {
        sb.Append(prefix);
        sb.Append(s);
        prefix = separator;
    }
    return sb.ToString();
}
The Basic Principles of Remote Debugging
When GNU Debugger is running on one machine and the program being debugged on another – this is called remote debugging. Commonly GNU Debugger is running on a classic PC while the program being debugged is running on some sort of embedded board / or in our case on a ZX Spectrum.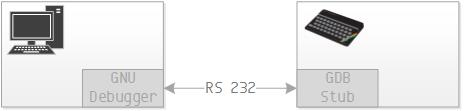
The GNU Debugger for Z80 on PC side knows everything about Z80: the registers, the instructions, the address space. It also knows everything about the debugged program because the debugged program is first loaded into GNU Debugger on PC side and only then sent to ZX Spectrum via serial line by GNU Debugger using special protocol. So the GNU Debugger has the opportunity to examine program’s symbolic information and obtain address of every variable and every function within the program.
- setting a breakpoint at certain address by writing an instruction that returns control to the debugger (RST) there;
- overwriting breakpoints by program’s code on continue,
- returning the values of all registers.
Remote Debugging using FUSE ZX Spectrum Emulator
Remote debugging of code running on an emulator requires a bit more effort. First the serial protocol on ZX Spectrum is converted to named pipe protocol on Unix. Escape sequences are inserted into named pipe data stream to separate data bits from control bits. This makes direct stream communication with the GNU Debugger impossible due to data corruption. And as if this was not bad enough – the GNU Debugger does not speak named pipes. It only “speaks” RS232 and IP. The solution is to write a PC program which talks to both sides in their own language. It communicates with GNU Debugger using IP protocol and with FUSE using named pipes and escape sequences.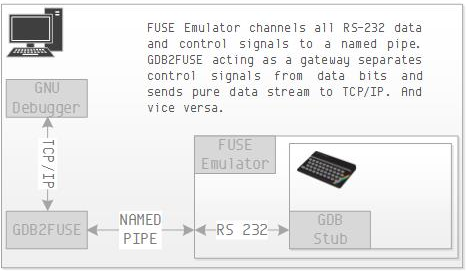
This program is called GDB2FUSE. It has been added to the yx repository. So clone or pull the yx repository to your working folder again. Then go to subfolder yx/tools/gdb2fuse and do make. It will build the command line tool that you need. You may want to copy it to your /usr/local/bin for frequent use.
The GDB Stub for ZX Spectrum
Primarily it requires us to write serial read and write procedures in a way to trick the buggy FUSE Emulator to.
We also need to change breakpoint command because the original gdb-z80 uses RST8 jump instruction for that and on the ZX Spectrum this is reserved for Interface 1 calls. And we do need Interface 1 because serial port is part of it.
To cut the long story short, you can download the code for ZX Spectrum stub from git and compile it. It is locate in yx/tools/gdb-zxspectrum-stub folder and has a Makefile to make things easier for you. This will produce the 48.rom file for you. Currently it only runs on Fuse emulator.
Allright! Let's Do It!
First let us create named pipe files in your home folder. Go to your home folder and do
mkfifo rx tx
gdb2fuse 6666 ~/tx ~/rx
fuse --machine 48 --interface1 --rs232-tx ~/tx --rs232-rx ~/rx --graphics-filter 2x --no-rs232-handshake --rom48 48.romSpectrum's screen should be black. This signals it is in server mode and listening on the serial port for debugger's commands. Now is the time to run the GNU Debugger.
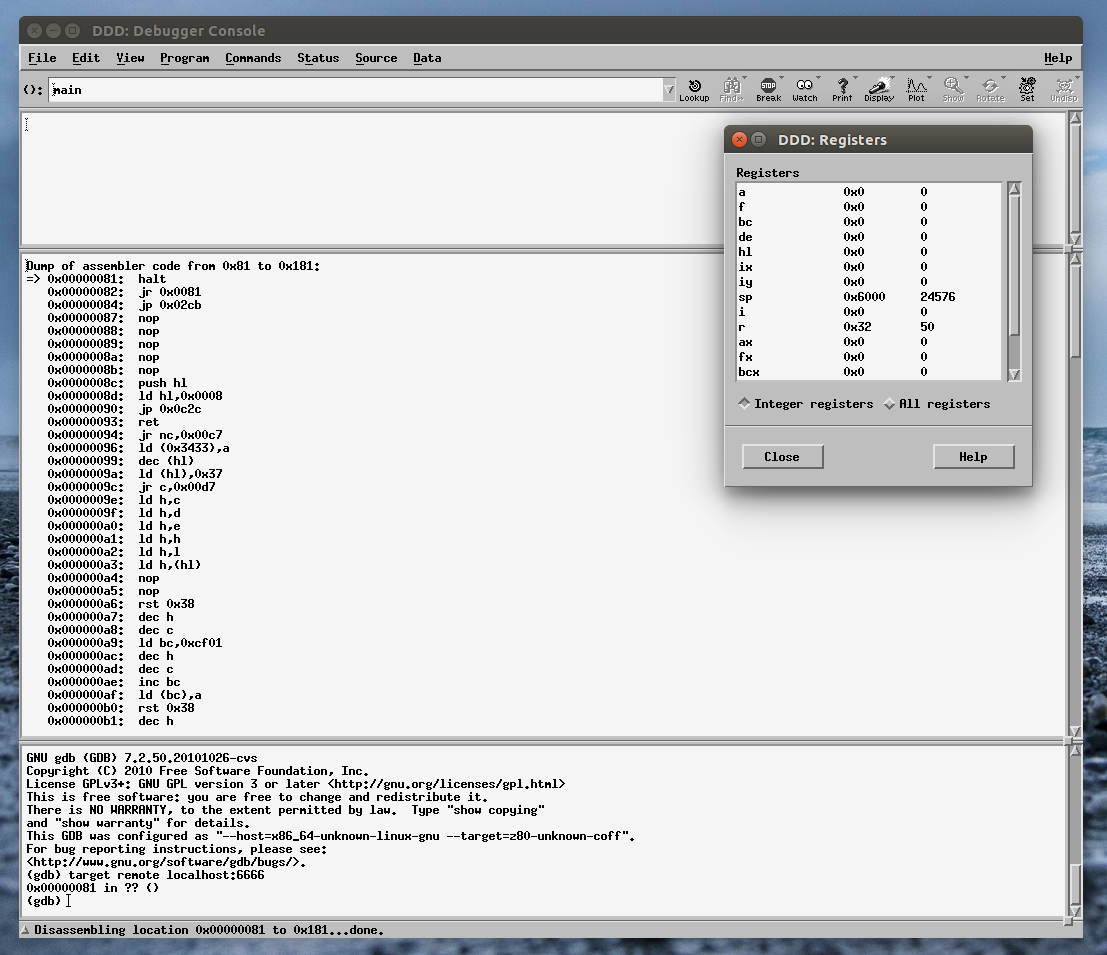
ddd --debugger /usr/local/bin/z80-unknown-coff-gdb &Then go to bottom pane and type
target remote localhost:6666
So You Wanna Be a ZX Spectrum Developer? (Part II. The Template Application)
1 comment(s) at 5:23 AM
Let us compile'n'run stuff.
In part I. of this turorial you "gitted" yx repository to your local disk. If you followed the tutorial then your target folder was ~/dev/yx.
Open the terminal and set this as your current working folder. Go to tools subfolder (e.g. execute cd ~/dev/yx/tools). There are a bunch of useful tools inside but right now we are only interested in makezxbin. This is an upgraded makebin tool that enables us to use SDCC C compiler for ZX Spectrum development.
You are free to choose z88dk instead. But SDCC is -in my opinion- a more mature environment. It supports C99; has as advanced code optimizer; and produces gdb-z80 compatible symbolic information. z88dk on the other side has superior libraries and ZX Spectrum support.You can compile and deploy makezxbin like this:
cd makezxbin
gcc makezxbin.c -o makezxbin
sudo mv makezxbin /usr/bin/makezxbin
Congratulations! You now have a complete suite of compiler tools needed to develop for ZX Spectrum.
Now go to the ~/dev/yx/apps/template folder and run make. This will create a template application which writes a value of 255 to the first byte of video memory. When it is run the result will be 8 pixel line in the first row of the screen:

The make file will also run the emulator and load your app.You can use this template application as a quick starter for most of your development projects. Let's analyse it.
First there is a pretty straightforward Makefile. Its main target is app.bin. The Makefile assumes that all *.c files ald all *.s files are part of our project. Thus if you add new source files - it will automatically consume them as part of our project.
For easier understanding here are the unconventional tricks of this Makefile:
- it uses your standard gcc (and not SDCC!) compiler to generate .depend file out of *.c and *.h source files for easier compilation,
- it puts crt0.s to 0x8000 and your program to 0x8032, so if you change crt0.s (increasing its length above 0x32 bytes) make sure you update your programs' start address,
- it uses our makezxbin tool to generate correct binary (makebin has a bug and can't be used for this purpose), and
- it uses SDCC all the way but at the end executes appmake +zx --binfile ./app.bin --org 32768 to generate ZX Spectrum tape. appmake is part of z88dk and this is one reason installing both development environments in part I. of this tutorial.
- stores current stack pointer and contents of all registers,
- jumps to start of GSINIT assembler section where the SDCC compiler places all global variables initialization code,
- establishes stack (1KB) and heap global symbols for our program,
- jumps to _main C function, and
- when the main concludes restores registers and stack and returns control to BASIC.
void main() {
    unsigned char * vmem = 16384;
    (*vmem)=255;
}
You can examine the locations of your symbols (variables, functions) by opening crt0.map file after compilation.That's it for yoday. Enjoy your experimenting. Our next tutorial will be about debugging.
Here are some useful tips to help you start.
1. Download latest version of Ubuntu Desktop edition. I warmly recommend that you create a separate environment either by installing Ubuntu to a new partition or to a virtual machine. You see ... mid age crises ... come and go. While installed packages ... stay on your disks forever.
2. Download and install FUSE – the ZX Spectrum emulator. Since it lacks Sinclair ROM files, download and install these too.
sudo apt-get install fuse-emulator-gtk spectrum-roms

3. Download and install development suites.
sudo apt-get install sdcc z88dkYou don't actually need both C compilers. But each brings some handy tools that other can use. So install them both.
4. Download git and subversion so you'll be able to check out files from remote repositories
sudo apt-get install git subversion5. Install Z80 language definition for gedit.
5.1. Download z80.lang.zip and extract file z80.lang.

5.2. Modify it by changing this line:
<property name="globs">*.z80</property>to this line:
<property name="globs">*.s</property>You are telling gedit to treat all files with extension *.s as Z80 syntax files.
5.3. Now copy z80.lang into /usr/share/gtksourceview-3.0/language-specs folder.
6. Open terminal, create work folder and download the yx repository.
tomaz@jabba:~$ mkdir dev
tomaz@jabba:~$ cd dev
tomaz@jabba:~/dev$ git clone https://github.com/tstih/yx.git
Cloning into 'yx'...
remote: Reusing existing pack: 755, done.
remote: Total 755 (delta 0), reused 0 (delta 0)
Receiving objects: 100% (755/755), 5.60 MiB | 398.00 KiB/s, done.
Resolving deltas: 100% (270/270), done.
Checking connectivity... done.
tomaz@jabba:~/dev$ cd yx
tomaz@jabba:~/dev/yx$ ls
apps  buddy  os  README.md  tools
tomaz@jabba:~/dev/yx$_
7. Extend gedit.
7.1. First open file ~/dev/yx/os/rom/crt0.s with gedit. If Z80 language is installed correctly you should see highlighted Z80 code.

7.2. Now press F9 or select menu option View -> Side Panel. When the left pane appears change tab at the bottom of left pane from Documents to File Browser.

That's it for today. In second part of this tutorial we're going to compile and run stuff. Promise.
GNU Make is a decent tool. But due to the fact that I commonly create only a handful of Makefiles per project and that its syntax is easy to forget (or -perhaps- hard to remember) - it often takes me an hour before I create a new generic Makefile for a project.
More often then not I end up analysing and recycling an existing one from one of my previous projects. Thus I wrote a generic Windows starter that will work on any folder that contains .c and .h files as long as you have The GNU C Compiler Suite and Make installed on your machine.
Simply add this Makefile to your folder and change the target (the default is "buddy.exe") to the name of your desired exe output file. Make sure that one .c file contains the main function and the rest will be done by the build system.
The main tricks being used are:
1. Obtaining list of all *.c files in folder...
SRCS = $(wildcard *.c)2. ...using it to generate all object files.
OBJS = $(patsubst %.c,%.o,$(SRCS))3. Creating dependency file named .depend by using -MM switch on gcc (i.e. fake compilation step).
$(CC) $(CFLAGS) $(SRCS) -MM >> .depend4. Including dependency file into makefile using -include (minus means it will not complain if the file is not there i.e. on the first run).
-include .depend5. And last but not least: redirection of stderr to NUL to prevent DEL command from complaining when there are no matching files.
del *.o 2>NULHere is the entire Makefile.